
Defining parameters
As stated before, you can add parameters to your custom component. Parameters are used to define the settings of a component. There are two types of parameters: basic parameters and advanced parameters. In essence they’re the same, however basic parameters imply necessary settings or key settings and advanced parameters imply optional settings. Of course, it’s not mandatory to define parameters, it’s just a possibility. Once you’ve defined these parameters, you can see them in the “Basic settings” and “Advanced settings” panel of the component.
Where exactly are these parameters defined? Well, if you’ve followed the tutorial all the way up to this point, you might remember that there’s a PARAMETERS tag in the XML descriptor file. Currently that tag doesn’t contain anything yet, which means no parameters are defined. This specific tag refers to the basic parameters of a component. If you don’t want to define any basic parameters, you can just specify the following: <PARAMETERS/>. Next to this tag, there’s a separate tag for the advanced parameters of a component called ADVANCED_PARAMETERS. If you don’t want to define any advanced parameters, you can just specify <ADVANCED_PARAMETERS/> or leave this tag out of the XML descriptor file in general. It’s already been proven that you can actually leave the tag out, because we’ve never even added it to our current XML descriptor file and the component works perfectly.
I’d like you to open the tFirstComponent_java.xml file, the XML descriptor file, and paste the following code between the CONNECTORS tag and the CODEGENERATION tag:
<PARAMETERS>

<PARAMETER

NAME="FirstBasicParameter"

FIELD="TEXT"

REQUIRED="true"

NUM_ROW ="1" >

<DEFAULT>"Insert text"</DEFAULT>

</PARAMETER >

<PARAMETER

NAME="SecondBasicParameter"

FIELD="CHECK"

REQUIRED="false"

NUM_ROW ="2" >

<DEFAULT>false</DEFAULT>

</PARAMETER >

</PARAMETERS>

<ADVANCED_PARAMETERS>

<PARAMETER

NAME="FirstAdvancedParameter"

FIELD="INTEGER"

REQUIRED="true"

NUM_ROW ="1">

<DEFAULT>0</DEFAULT>

</PARAMETER>

<PARAMETER

NAME="SecondAdvancedParameter"

FIELD="MEMO_SQL"

REQUIRED="false"

NUM_ROW="2">

<DEFAULT>"select * from employee"</DEFAULT>

</PARAMETER>

</ADVANCED_PARAMETERS>
As you can see we added a total of 4 parameters, 2 basic parameters and 2 advanced parameters. Let’s take a closer look at the attributes which are defined for every parameter:
- NAME: With this attribute you define the unique name of a component. This name will be used to reference the parameter in the code of the JET files.
- FIELD: With this attribute you indicate what the parameter can store. The default value is “TEXT”, meaning that the parameter can store a string. There are multiple possibilities though. When you look at the parameter “SecondBasicParameter”, the value “CHECK” has been given to the attribute. This means that the parameter can verify whether a checkbox has been checked or not. In the background a boolean value is being interpreted, which is either true or false. The content of the parameter, e.g. a text box or a checkbox, is also determined by the value of this attribute.
- REQUIRED: This attribute indicates if a job will actually start or not, depending whether or not a value was given to the parameter. This implies that if this attribute gets the value false, a job will be run even if the parameter wasn’t given a value. If this is not the case and it gets the value true, then the job will not be run if the parameter wasn’t given a value.
- NUM_ROW: This attribute specifies where a certain parameter will appear in the “Basic settings” or “Advanced settings” panel, depending on the type of parameter. It represents the relative line number. For example, the “FirstBasicParameter” parameter will appear on the first line and the “SecondBasicParameter” parameter will appear on the second line, or in other words underneath, in the “Basic settings” panel. Of course, it’s perfectly possible to have multiple parameters on the same line directly next to each other. In that case, all you have to do is give those parameters the value 1.
Both the NAME and FIELD attributes are mandatory attributes when adding a parameter to a component. If you don’t use these attributes but only the REQUIRED attribute for example, the following error will be returned:
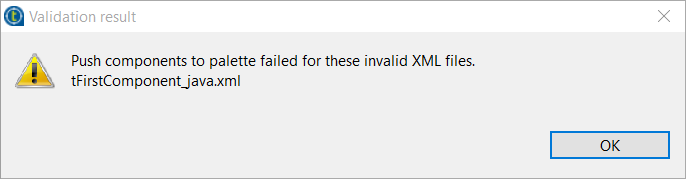
So make sure these attributes are present. You’ll notice that, inside the parameter tag, there’s another element called DEFAULT. This element allows you to set a default value for the parameter. When a parameter requires you to insert a certain string, you can set a default value of “hello world” for example.
We’ve now handled just a few possible attributes, however there are more attributes available. To get a list of these, you can go to the following link: http://www.talendbyexample.com/talend-custom-component-xsd.html
The parameters are all set. Go ahead and push the component to the Palette. Open the job you’ve made for this tutorial and, if the custom component is on the job canvas, delete it and drag it over there again. I do this every single time a change is made to the component concerning parameters, to make sure the latest changes are visible. You can also just execute the job again. A pop up will appear stating that the component has to be reloaded. Just click “OK” and the job will be executed with the updated component.
Once the component is updated, take a look at the “Basic settings” panel and the “Advanced settings” panel. I hope you noticed that the labels of the parameters contain very weird names, like “!!!FirstBasicParameter.NAME!!!”, as seen in the image below:

The reason for that is the fact that we haven’t specified a label for the parameters yet. The weird names are the default labels. Let’s go ahead and specify these labels. Despite what you might think, these labels are not defined in the XML descriptor file but in the message property file. Open the tFirstComponent_messages.properties file and add the following lines:
FirstBasicParameter.NAME=FirstBasicParameter

SecondBasicParameter.NAME=SecondBasicParameter

FirstAdvancedParameter.NAME=FirstAdvancedParameter

SecondAdvancedParameter.NAME=SecondAdvancedParameter
Now push the component to the Palette again and follow the previously described steps. You should see the following in each tab:


Parameters in action
The parameters have been defined and are equally visible when checking the component. Now it’s time to put these parameters to use! As stated before, you can reference a certain parameter in the JET files. Basically, the point is to get the value that a parameter contains. There’s a class called ElementParameterParser which allows us to do exactly that. It gets the value from a node, which is an actual parameter, with a method called getValue. The specification of this method is the following: ElementParameterParser.getValue(IElement node, java.lang.String text). It’s important to note that this method will always return a String, regardless of the data type you might’ve defined when creating your parameters in the XML descriptor file. This means that all parameters are of the type String.
Let’s add some more code to the tFirstComponent_begin.javajet file (the code which isn’t present yet, is marked in bold):
—–import statements—-
<%

CodeGeneratorArgument codeGenArgument = (CodeGeneratorArgument) argument;

INode node = (INode)codeGenArgument.getArgument();

String cid = node.getUniqueName();

String basicTextBox = ElementParameterParser.getValue(node, "__FirstBasicParameter__");

String basicCheckbox = ElementParameterParser.getValue(node, "__SecondBasicParameter__");

int numberOfIterations = Integer.parseInt(ElementParameterParser.getValue(node, "__FirstAdvancedParameter__"));

%>
—–previously written code—-
First of all, make sure that the “org.talend.core.model.process.ElementParameterParser” import statement is present in the imports section. It imports the ElementParameterParser class, which is necessary to be able to use it in the code. Now take a look at the getValue method. For each parameter a separate variable was created. Those variables then get the value that is returned from the method. The method itself has 2 parameters: a node parameter, node being an instance of INode, and a string parameter representing the unique name of the parameter which was defined in the XML descriptor file. I hope you noticed the second parameter requires a prefix and a suffix, namely “__”, which is a double underscore. Please keep in mind that you have to add these statements to the JET template, so between “<% %>” tags. In this piece of code, the first and second basic parameters are used, as well as the first advanced parameter. The second advanced parameter isn’t used, because in the remainder of the code we won’t do anything with it. You can of course add some code for this parameter later on if you want.
In the remainder of the code we’re going to add some functionality to the parameters. For the first basic parameter, we want the text, which is inserted in the text box to be printed on the console. This means that the parameter will be used to generate Java output code. For the second basic parameter, we want to print a certain text/string on the console whenever the checkbox is checked. In this case the parameter will be passed as a constant to the Java output code. For the first advanced parameter, we want the number, which is inserted in the text box, to represent the amount of iterations that the previously defined loop goes through.
Go ahead and adjust the code in the JET file to the following (yet again, code changes are marked in bold):
<%

CodeGeneratorArgument codeGenArgument = (CodeGeneratorArgument) argument;

INode node = (INode)codeGenArgument.getArgument();

String cid = node.getUniqueName();

String basicText = ElementParameterParser.getValue(node, "__FirstBasicParameter__");

String basicCheckbox = ElementParameterParser.getValue(node, "__SecondBasicParameter__");

int numberOfIterations = Integer.parseInt(ElementParameterParser.getValue(node, "__FirstAdvancedParameter__"));

%>
System.out.println(<%=basicTextBox %>);
<%

if (basicCheckbox.equals("true"))

{

%>
System.out.println("Checkbox in the Basic settings tab is checked!");
<%

}

%>
System.out.println("First section has been executed --> Start");

for (int counter_<%=cid %>=1;counter_<%=cid %> <= <%=numberOfIterations %>;counter_<%=cid %>++)

{
The code is self-explanatory. However, take a look at the if statement. You’ll notice that we’re opening and closing the “%” tags. We’re doing that to enter and exit the template when needed. Remember this when writing future code in these files. Go ahead and push the component to the Palette again. Go to the Integration perspective and open your job again. Delete the component, drag it on the canvas and run the job. The output is entirely based on your configurations. By changing the parameter values you’ll notice the output changes time and time again.
The part about parameters is officially covered! You can experiment as much as you want now. Maybe you can try and implement the second advanced parameter and put the various possibilities to the test. In the fourth and last part of this tutorial we’re going to take a look at connections.
Download the full tutorial here
Used sources:
- http://www.talendbyexample.com/talend-custom-component-xsd.html
- http://www.powerupbi.com/talend/componentCreation_1.html
- https://help.talend.com/display/KB/What+is+a+Talend+component
- https://help.talend.com/display/KB/How+to+create+a+custom+component
- http://www.talendbyexample.com/talend-api-for-component-designers.html