
How to implement Slowly Changing Dimensions (SCD) in Talend (part 2/2)
In the previous blog we talked about the different types of Slowly Changing Dimensions. We went into more detail on SCD type 2. In this blog we will show you how to implement SCD in Talend. First, we will talk about the built-in SCD component and why you probably shouldn’t use it. Next, we will provide a tutorial on a custom solution for SCD type 2 in Talend.Built-in SCD component
Talend has a built-in component to keep track of SCD: tDBSCD. This component can implement type 1, type 2 and type 3 SCD. However, it has one major downside: its performance. Figure 1 shows a comparison of the execution time of a Talend job where all source data was tracked using SCD type 2; once using the built-in tDBSCD component (red) and once using the custom workflow proposed in this blog (blue). Each execution time on the graph is an average of three runs with an average of 30% inserts and 70% updates.

These results indicate a significant increase in execution time when using the tDBSCD component starting from 1000 rows. By comparison, there is only a very slight increase in execution time with the custom workflow. This indicates that the custom workflow is much more scalable than the tDBSCD component. Although keep in mind that it is not infinitely scalable. In our experience, the custom workflow can handle around 1 million records without making adjustments (depending on your job server’s memory settings, of course). If you want to scale for more records, you will likely run into out-of-memory issues. These can be handled with tMap tricks like storing temporary data or reloading at each row to a certain degree. But, for truly big datasets (10 million records and onwards) these will also not help. In these cases it can be useful to limit the input to records created within the last week or so.
Custom approach to SCD type 2
To do SCD Type 2 you need to detect changes between the source and target system. Detecting ‘inserts’ is easy: simply verify whether the record from the source system exists in the target system. Similarly, for ‘deletes’ you need to verify whether there are records that exist in the target system that don’t exist in the source system. ‘Updates’ are a bit trickier, you need to detect if the record was changed by comparing the source and target record. This brings us to step 1 of this tutorial.
Step 1: generating a hash string
To easily compare the source record to the target record you can generate an md5 hash string. This string is then stored as an extra column in the target system.
First, create a new java-routine with the following code:
package routines;
import org.apache.commons.codec.digest.DigestUtils;
public class DigestUtilities {

    public static String md5(String s){
        return DigestUtils.md5Hex(s);
    }
}
It uses the md5Hex method from the commons-codec library. This method creates an md5 hash string based on an input string. To use this routine, you will have to add this library to Talend as well.
Next, generate the hash string for each record. To do so, you can read in the source data and call the routine. The result is mapped to a new variable. If you only want to keep track of SCD on certain columns the easiest way is to concatenate them into a String and feed this String into md5Hex. A separator is added between each column to make sure a new hash_id is created.

routines.DigestUtilities.md5(
row1.cat_id + "#" +
row1.name + "#" +
row1.age + "#" +
row1.fur
);
When you want to apply SCD to all columns you can also use the following code:
routines.DigestUtilities.md5(
row1.toString().substring(row1.toString().indexOf("[")+1, row1.toString().lastIndexOf("]"))
);
This ensures the hash String is based on all incoming rows, even if you were to add some later.
Step 2: Handling inserts and updates
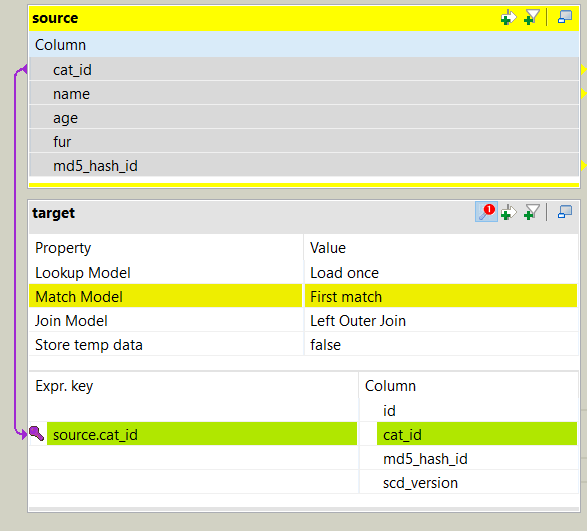
To detect an ‘insert’ we need to check if the source record occurs in the target system. To detect an ‘update’ we need to check if the hash string we just generated for the source records is the same as the hash string stored for this record in the target system. We do this through a join and some code.
First, the join: we’ll do an outer join on the business key from source to target. We’ll query the following things:
- id: primary key of the target table
- cat_id: business key from the source table
- md5_hash_id: hash string of the record stored in the target table
- scd_version: version of the record
Next, the code: we’ll use the following logic to differentiate between inserts and updates
- If the primary key (id) for the record in the target table is null, the record is an insert. Denoted by “I”.
- If the primary key (id) for the record in the target table is not null AND the md5_hash_id of the source record is not equal to the md5_hash_id of the target record, the record is an update. Denoted by “U”.
- All other cases are denoted by “X”

In code:
target.id == null? "I":
target.id != null && target.md5_hash_id.equals(source.md5_hash_id) ? "X" :
target.id != null && !target.md5_hash_id.equals(source.md5_hash_id) ? "U" : "X"
The result of this conditional is stored as an expression variable and used to filter the records for each flow.

As mentioned above, we want to take the following actions when encountering ‘inserts’ and ‘updates’:
- ‘Inserts’: new record is inserted as an active record
- ‘Updates’: old record is set to inactive, updated record is inserted as an active record
To implement this, we need three output flow:

Inserts
A new record is inserted. The scd fields are filled in:
- scd_start = current datetime
- scd_end = null
- scd_version = 1
- scd_active = true
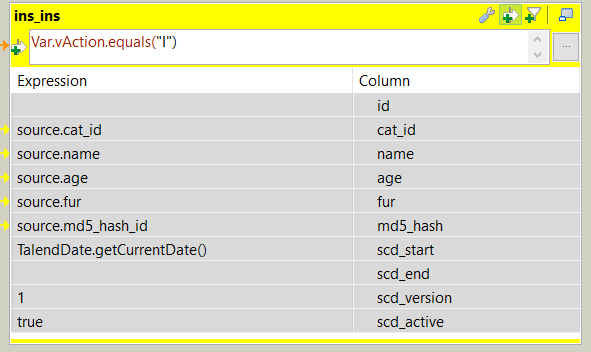
The action on the output data is set to insert. Using the advanced settings field options we can specify that all columns should be inserted, except ‘id’ (which is handled by the database as type serial).

Updates
The updated record is inserted (upd_ins):
- scd_start = current datetime
- scd_end = null
- scd_version = version + 1
- scd_active = true

The action on the output data is set to insert. Using the advanced settings field options we can specify that all columns except ‘id’ should be inserted
The old version of this record is updated (upd_upd):
- scd_end = current datetime
- scd_active = false
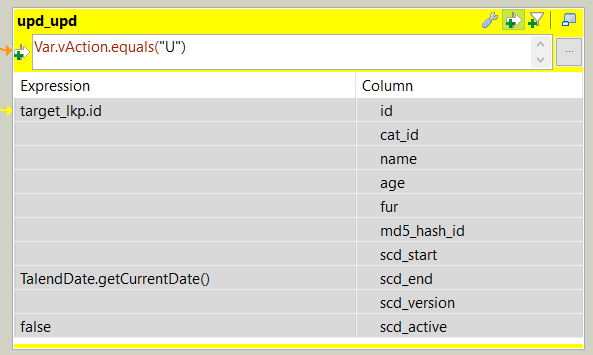
The action on the output data is set to update. Using the advanced settings field options we can specify that the update key is ‘id’ and only the columns ‘scd_end’ and ‘scd_active’ should be updated.

Step 3: Handling deletes
To detect ‘deletes’ we need to check if there are records in the target system that are no longer in the source system. To do so, we need an inner join between target and source. Then we’ll catch the rejected records of this join. In other words, we’ll detect the records that were in the target, but not in the source! Remember that we’re not going to actually delete these records from the target system, they will just be set to inactive.

For the tDBOutput component, we’ll use the same method as with the upd_upd flow. The action on the output data is set to update (not delete!). In the advanced settings field options we can specify that the update key is id and only the columns scd_end and scd_active should be updated.
And there you have it, a custom workflow in Talend to do SCD type 2!
Conclusion
In this blog we propose a custom workflow to do SCD type 2 in Talend. The advantage of this approach is that it is more flexible and more scalable than the built-in Talend component. A disadvantage is that it is more complex to implement.