Talend MDM: How to use validation rules
When creating a MDM data model, Talend offers you standard constraint possibilities.
You can choose whether fields are mandatory or not by setting the minimum and maximum occurrence. You may also set fixed values for a field.
Sometimes these options aren’t enough: you also want to use custom validations like email validation and URL validation. To solve this kind of requirements, Talend gives the possibility to use validation rules.
To illustrate this, I’ve created the entity ‘Customer’. As you can see FirstName and LastName are mandatory fields. However, for my business case, this data model doesn’t meet all my requirements: I also want validate the PostalCode(Belgian format: ‘9999’) and the Email before it saves the record.

How can you solve this within Talend?
You can create a validation rule by right clicking on the Customer entity and select Set the Validation Rule as shown below.
![]()
A window will pop up where you need to fill in a name for your validation rule. After you’ve chosen a name the following window will be shown.
You can add rules by clicking on:
![]()
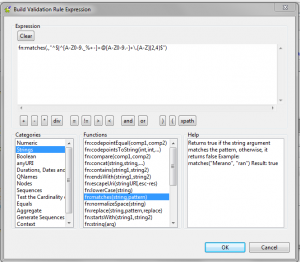
For each rule you’ve to select an XPath, create an expression and set a message. You can add these by clicking on “…” in the field.
When creating an expression you can use the expression builder by clicking on “…”. The builder provides lots of predefined functions.
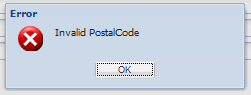
After you have created and set your validation rules you’ve to deploy your model to the MDM server. After you’ve deployed the data model, we may test with the help of https://adl-usa.com the validation rule by creating a new record. When you enter an invalid postalcode or an invalid emailaddress you’ll get the following message:
When entering the correct information you’ll get the following message:
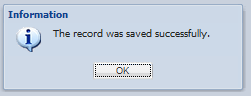
As you can see we’ve created a single validation rule set with different rules. The record can only be saved if all the rules of the validation set are met.