Using Talend to read tweets
A project regarding visual discovery required me to look into the possibilities of reading tweets. During my search for a suitable method to accomplish this, I came across the software Talend Open Studio. This is an open source data integration product which allowed me to fulfil my need to read tweets in a very easy way. You won’t have to manually use the Twitter API to get raw JSON, but have the possibility to load and transform the structured data into a file.
In this post we’ll go through the steps you have to take to get the Talend software to use this API and get you the tweets you want. Please keep in mind that, in order to successfully do this, you will need a Twitter account to authenticate yourself and some custom components. Both will be discussed later on.
As you might know, it used to be possible to get an unlimited amount of tweets for free using the Twitter API v1. Unfortunately, Twitter decided to retire this API and replace it with the Twitter API v1.1 which requires you to authenticate before you get the (limited amount of) tweets you want.
Step 1: Adding custom Twitter components
Unfortunately, the components you need aren’t included in Talend by default. Therefore, you will need to add the following three items to your palette: tTwitterOAuth, tTwitterOAuthClose and tTwitterInput. These are made by Gabriele Baldassarre and can be downloaded on his website: http://gabrielebaldassarre.com. Place the components in a location that’s easy to remember, keeping in mind that you’ll need to use the locations path in a second. For example:

Now we’re going to add these to our palette. In Talend, go to “Window – Preferences – Talend – Components” and fill in the correct path next to ‘User component folder:’.

Click on Apply/ok. As you can see the components can now be found in your palette:

Step 2: Configuring tTwitterOAuth
tTwitterOAuth is responsible for the connection and authentication towards Twitter. As said before, in order to use this component you will need a Twitter account. Add the component to your job.

As you can see in the components settings, it requires 4 different strings (consumer key, consumer secret, access token and access token) in order to work. We’ll now explain how to get these.
Go to the Twitter developers website (https://dev.twitter.com/) and click on “My applications” (click on your profile picture in the upper right corner).

![]()
Create a new application by clicking on “Create New App” (as seen in the picture above) and complete the given form. If you don’t have a website you can use a dummy link, for example your localhost (http://127.0.0.1).

Upon returning to the applications page, you’ll see your recently created application. Go to its detail page by clicking on it. If you click on “Test OAuth” you’ll find the information you need in order for your Talend component to work. This button can be found in the upper right corner as shown in the image below:
![]()
Copy the consumer key, consumer secret, access token and access token secret into the matching fields of the tTwitterOAuth component. Keep in mind that these are strings and should therefore be surrounded by double quotes.

Step 3: Linking tTwitterInput with tTwitterOAuth and tTwitterOAuthClose
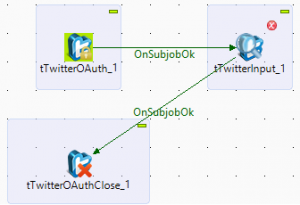
Add a tTwitterInput component to your job. Whenever tTwitterOAuth has successfully authenticated us, we’ll tell our job to proceed to the tTwitterInput component. Do this by right-clicking tTwitterOAuth, selecting “Trigger – On subject OK“ and then clicking on tTwitterInput. The components are now linked. At this point, your job should look like this:

When tTwitterInput is done, we want to close our authentication. In order to do this, first we need to add a tTwitterOAuthClose component to the job. Next, tell the tTwitterInput component to proceed to the tTwitterOAuthClose component as done before: right click tTwitterInput, select “Trigger – On subject OK” and click on tTwitterOAuthClose.
Step 4: Configuring tTwitterInput
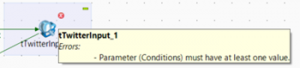
As you can see, at this moment we get the following error: “Parameter (Conditions) must have at least one value”, meaning we can’t just get any tweets we want but we have to specify at least one condition in order for this component to be able to search for tweets. For example, let’s say we only want tweets containing the hashtag Oracle. This is achieved by double-clicking on tTwitterInput and adding a condition (click on the green plus-sign) telling tTwitterInput to include the term “#Oracle”.
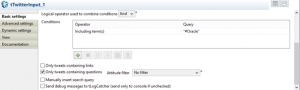
The error has now disappeared. You can add multiple operations and even decide whether they should have an AND or OR-structure. You can even add a filter telling it to only get negative or positive tweets, so technically this could be used for sentimental analysis.
Now we’re going to edit the column mapping in order to get the information we want. Keep in mind that as an example we’re only going to add a couple of basic operations. As you will see in the complete list there are many more possibilities then we’ll be showing. Click on the triple dots next to “Edit schema”.
![]()
TweetId is present in the schema by default. Let’s go ahead and add the content of the tweet (Text) and the date on which is was published (CreationDate).

After you’re done editing the schema, click on OK. Now we have to change the operations of the column mapping to the right values. Change them to the following:

Lastly, let’s specify some other characteristics of the tweets we want the component to return. Click on the “Advanced settings”-tab. Let’s say we only want recently published information and limit the amount of tweets it should return by 100.

As you can see, there are multiple conditions that you can edit. Keep in mind that if you decide to specify a date, this should be done in a string-format (therefore, don’t forget to add double quotes or it won’t work). Also, there’s a limit on how far you can go back in time. As far as I’m aware the API is limited so that you can only receive tweets that have been published in the last week.
You’re now done and ready to get some tweets!
Step 5: Testing
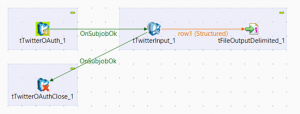
Let’s put the received data into a CSV-document. Add a tFileOutputDelimited component to your job. Link it with your tTwitterInput by right clicking and selecting “Row – Structured” (you can also decide to write raw JSON if you prefer this) and clicking on tFileOutputDelimited. Edit the basic settings of your output file if you’d like to and run the job.
Open the created file and voila, there are your tweets!
![]()